A thermometer in R using Arduino and Java
A couple of weeks ago, Markus Gesmann demonstrated the feasability of connecting R and Arduino using Processing and Rserve in a nice and simple example. This actually rekindled my interest in Arduino that I hadn’t had time to satisfy…
Again I will show a very easy and simple example, but this time, transferring the data between Arduino and R via Java. That way, we can use Arduino in a “pull” mode rather than in a “push” mode. Indeed, typically the Arduino sketch is written such that the board is continuously sending information to the computer (each time it goes through the loop() function), but maybe we don’t want to listen to it and only retrieve information when we need it.
One of the useful item provided with the basic Arduino starter kit is the themperature sensor (called TMP36), which can also be useful in the everyday life. The idea of this exercise will thus consist in recording the temperature and showing this in an R chart. Practically, this means 3 steps involving a) setting up the Arduino board to capture the temperature, b) building a Java class to “pull” the temperature from the Arduio board, c) using the Java class from R to make our chart.
Set up the Arduino board
No need to do complicated things since the Arduino Experimentation Kit has an example code doing almost what we need. All details on the physical setup can be found here, we just need to tweak the code a little bit for our purpose.
As you will notice, the loop() function (which runs over and over again) prints the temperature to the serial port ending with a carriage return character. Yet, when we read from the serial port (later in Java), something interesting happens. For reasons that escape me, the data sent via serial is split in several packets of various sizes making the retrieval in Java a bit more arduous. To solve that issue, we are simply going to prepend a small header to our data, namely ‘T’.
The loop() function now looks like this:
void loop() {
     float temperature = getVoltage(temperaturePin);
     temperature = (temperature - .5) * 100;

     Serial.print("T");
     Serial.println(temperature);
     delay(1000);
}
We upload all what is needed on the Arduino board, and now it should be sending the temperature with its header every second (in “push” mode). You can use the Serial Monitor in Arduino IDE to check if this is fine. Now let’s use Java to get that information.
Build a Java class to interface
As suggested on the Arduino website, one possibility to connect Java to Arduino is through the RXTX library. You should follow the instructions here on how to set it up. Actually, the sample provided also does most of the job. Two things need to be taken care of.
- First of all, the Java class originally works with a listener on the serial port such that when the Arduino sends data, the Java app will print it. Because we want to use it in a “pull” mode, we will instead save the data in a buffer variable (temperatureBuffer). Remember we also added a header to the data being sent, so we take care of that too in the serialEvent function.
- Secondly, the original sample code works with a standard “main” function to be ran on its own. We don’t need it here, but instead we create a public function in our class that we will use in R to “read” the temperature from the buffer.
We end up with the following code for the Java class, that you then need to compile and build into a jar file (javac SerialTemperature.java then jar cf SerialTemperature.jar SerialTemperature.class).
import java.io.InputStream;
import gnu.io.CommPortIdentifier;
import gnu.io.SerialPort;
import gnu.io.SerialPortEvent;
import gnu.io.SerialPortEventListener;
import java.util.Enumeration;

public class SerialTemperature implements SerialPortEventListener {

    SerialPort serialPort;
    /** The port we're normally going to use. */
    private static final String PORT_NAMES[] = {
	"/dev/ttyACM0", // Linux port, might be different on your PC...
    };
    /** Buffered input stream from the port */
    private InputStream input;

    /** Milliseconds to block while waiting for port open */
    private static final int TIME_OUT = 2000;
    /** Default bits per second for COM port. */
    private static final int DATA_RATE = 9600;

    private String temperatureBuffer;

    public void initialize() {
	CommPortIdentifier portId = null;
	Enumeration portEnum = CommPortIdentifier.getPortIdentifiers();

	// iterate through, looking for the port
	while (portEnum.hasMoreElements()) {
	    CommPortIdentifier currPortId = (CommPortIdentifier) portEnum.nextElement();
	    for (String portName : PORT_NAMES) {
		if (currPortId.getName().equals(portName)) {
		    portId = currPortId;
		    break;
		}
	    }
	}

	if (portId == null) {
	    System.out.println("Could not find COM port.");
	    return;
	}

	try {
	    // open serial port, and use class name for the appName.
	    serialPort = (SerialPort) portId.open(this.getClass().getName(),
						  TIME_OUT);

	    // set port parameters
	    serialPort.setSerialPortParams(DATA_RATE,
					   SerialPort.DATABITS_8,
					   SerialPort.STOPBITS_1,
					   SerialPort.PARITY_NONE);

	    // open the streams
	    input = serialPort.getInputStream();

	    // add event listeners
	    serialPort.addEventListener(this);
	    serialPort.notifyOnDataAvailable(true);
	} catch (Exception e) {
	    System.err.println(e.toString());
	}
    }

    /**
     * This should be called when you stop using the port.
     * This will prevent port locking on platforms like Linux.
     */
    public synchronized void close() {
	if (serialPort != null) {
	    serialPort.removeEventListener();
	    serialPort.close();
	}
    }

    /**
     * This will be used by R to retrieve the temperature value
     */
    public synchronized Float read() {
	return Float.valueOf(temperatureBuffer.substring(1)).floatValue();
    }

    /**
     * Handle an event on the serial port. Read the data and save it to the buffer
     */
    public synchronized void serialEvent(SerialPortEvent oEvent) {
	if (oEvent.getEventType() == SerialPortEvent.DATA_AVAILABLE) {
	    try {
		int available = input.available();
		byte chunk[] = new byte[available];
		input.read(chunk, 0, available);

		String s = new String(chunk);
		if(s.contains("T")) {
		    temperatureBuffer = s;
		} else {
		    temperatureBuffer += s;
		}

	    } catch (Exception e) {
		System.err.println(e.toString());
	    }
	}
    }

}
Read the temperature from R
The final step, and maybe the easiest one for R people, is to read the temperature from R using the Java interface. That’s where the rJava package comes in handy. Remember to initialize the JVM with your newly built jar in the classpath, and you’re ready to go. We first initizalie the connection, then read the temperature whenever we want to simply using .jsimplify(.jcall(ardJava, returnSig='Ljava/lang/Float;', method='read')). The code below shows a simple application where we record the temperature to plot it using ggplot2. From there it’s pretty easy to do whatever you want with your temperature recorder. One could for instance use the statistical arsenal of R to make forecasts, and then display them using cool visualization on your website with Shiny?
setwd('/data/R/ArduinoTemp/')
require(rJava)
require(ggplot2)

.jinit(classpath='SerialTemperature.jar')
ardJava <- .jnew('SerialTemperature')

.jcall(ardJava, returnSig='V', method='initialize')

tempCapture <- NULL
while(Sys.Date()<'2012-11-11') {
  system('sleep 30')
  try({
    ans <- .jsimplify(.jcall(ardJava, returnSig='Ljava/lang/Float;', method='read'))
    tempCapture <- rbind(tempCapture, data.frame(Time=Sys.time(), Temperature=ans))
    print(ggplot(tempCapture) + geom_line(aes(x=Time, y=Temperature)) + theme_bw())
  }, silent=T)
}

.jcall(ardJava, returnSig='V', method='close')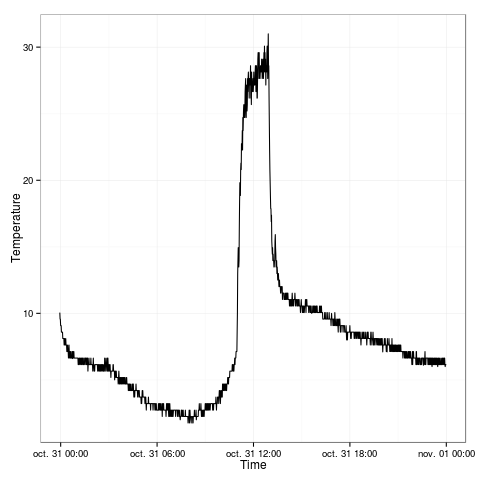
The chart shows the outdoor temperature during one day, sampled every 30 secondes. As you can see my window is exposed south, since the temperature spikes up around noon. Otherwise it’s quite cold for a November in Paris, barely 10 degrees…
All files used in this Arduino/Java/R example are available here: https://gist.github.com/4055869.
Comments
blog comments powered by DisqusRecent Posts 
- Optimal Meeting Point on the Paris Metro (Mar 2013)
- 1 + 1 = 3, the proof in R (Dec 2012)
- Prime Factorization Visualization with R and Shiny (Nov 2012)
- A thermometer in R using Arduino and Java (Nov 2012)
- Multiple progress bars (Feb 2012)